
How to implement a database proxy with PgBouncer: step-by-step guide
In the world of database management, proxies play a crucial role in improving system performance, security, and scalability. However, for many database administrators and backend developers, implementing a proxy can seem like a complex task. In this practical guide, I'll walk you step by step through the process of configuring a proxy in your database system. From basic concepts to practical examples, you'll learn everything you need to make the most of this powerful tool.
What is a database proxy and why is it important?
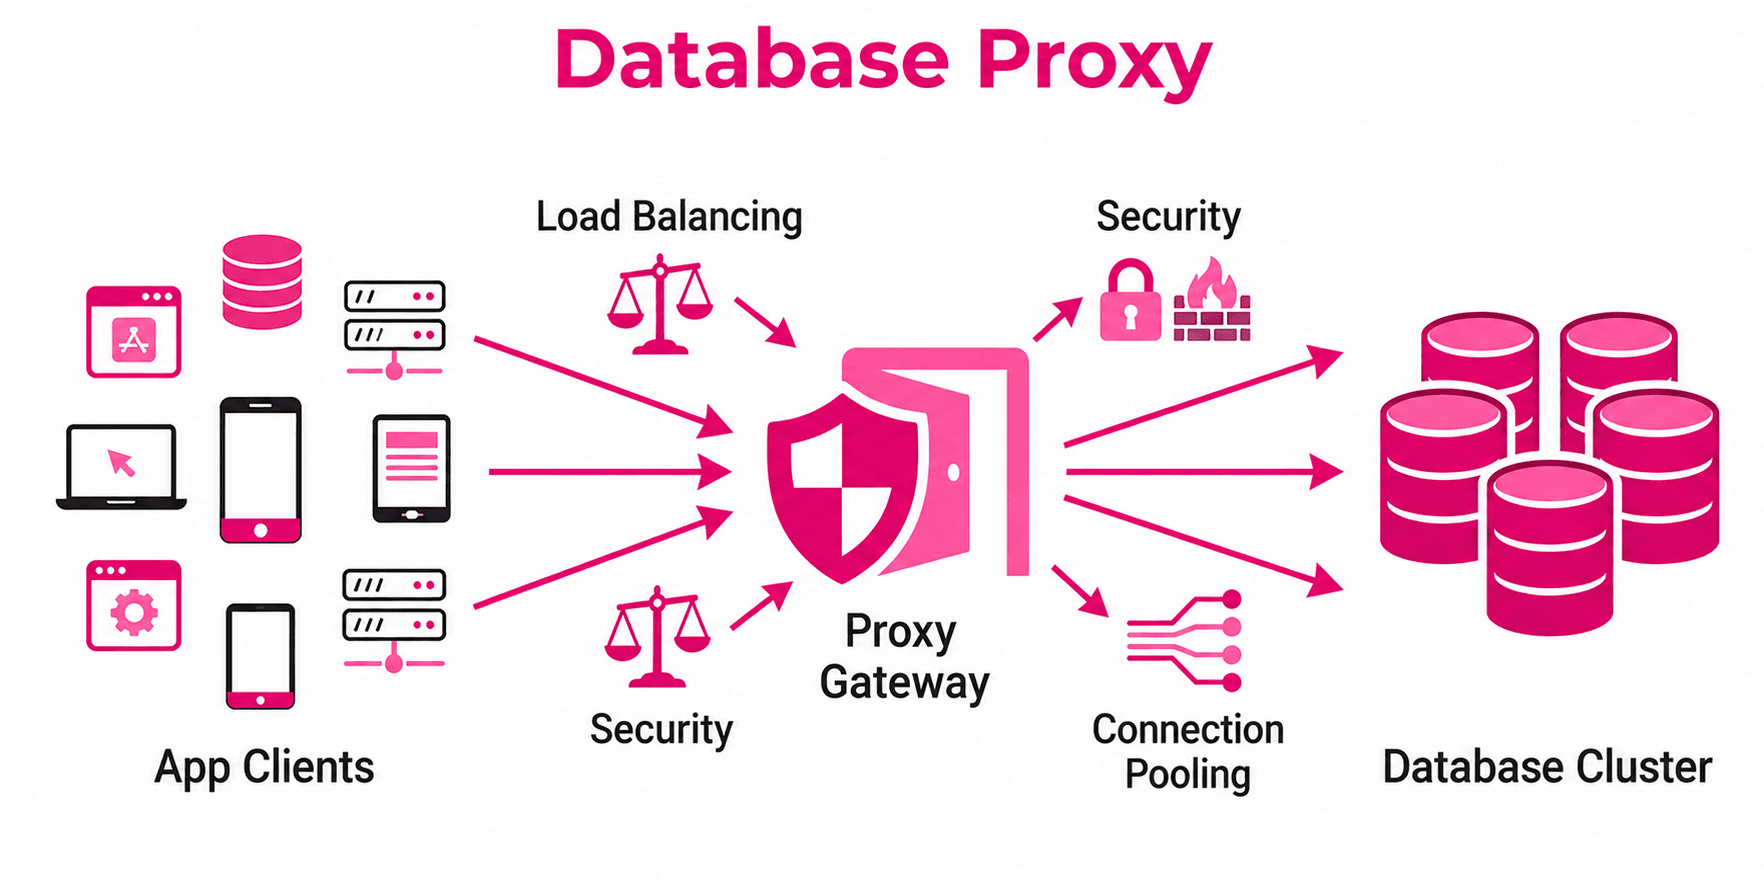
A database proxy is an intermediary between your applications and your database. Its main function is to manage connections, distribute load, and optimize communication. Imagine you have an application that needs to perform thousands of queries per second. Without a proxy, your database could quickly become saturated. This is where the proxy comes into play, allowing you to handle large volumes of traffic efficiently.
How does a database proxy work?
The operation of a database proxy can be understood in three main steps:
- Request reception: The application sends data requests to the proxy instead of directly to the database. This includes operations such as SQL queries, inserts, updates, and deletions.
- Processing and optimization: The proxy analyzes and manages the requests before sending them to the database. At this stage, it can implement optimizations such as connection pooling, caching frequent queries, or load balancing across multiple database servers.
- Response delivery: Once the database returns a response, the proxy processes it (if necessary) and forwards it to the application. This flow ensures smooth and efficient communication.
This mechanism is particularly useful in environments where multiple users or applications access the database simultaneously, as a proxy can properly manage connections to avoid bottlenecks.
Key advantages of using a database proxy
- Improved performance: Distributes load across multiple database servers.
- Scalability: Facilitates handling a larger number of simultaneous connections.
- Security: Provides an additional layer to filter and monitor traffic.
- Flexibility: Allows integrating different database technologies in the same system.
Prerequisites before starting
Before diving into the configuration, make sure you meet the following requirements:
1. Required technical knowledge
It is essential to have a solid foundation in:
- Database administration (MySQL, PostgreSQL, etc.).
- Server and network configuration.
- Use of command-line tools.
2. Recommended tools
Some popular tools for implementing database proxies are:
- PgBouncer: Ideal for PostgreSQL.
- ProxySQL: Compatible with MySQL and MariaDB.
- HAProxy: A versatile option for different databases.
3. Configured test environment
Work in a development or test environment, not directly in production. Make sure you have:
- A functional database.
- Access to a server or virtual machine to install the proxy.
- Stable connection between your application and the database.
Steps to implement a database proxy
Below is a practical example using PgBouncer for PostgreSQL. The process is similar for other tools, with adjustments depending on the specific software.
Step 1: Install the proxy
- Update packages on your server
sudo apt update && sudo apt upgrade
- Install PgBouncer
On Debian or Ubuntu-based systems, run:
sudo apt install pgbouncer
- For other operating systems, consult the official documentation.
Step 2: Configure PgBouncer
- Edit the main configuration file
The file is usually located at /etc/pgbouncer/pgbouncer.ini. Open it with your favorite text editor:
sudo nano /etc/pgbouncer/pgbouncer.ini
- Configure basic parameters
Add or modify the following lines:
[databases]
mydatabase = host=127.0.0.1 port=5432 dbname=mydatabase

[pgbouncer]
listen_addr = 0.0.0.0
listen_port = 6432
auth_type = md5
auth_file = /etc/pgbouncer/userlist.txt
pool_mode = transaction
max_client_conn = 100
default_pool_size = 20
- listen_addr: IP address where PgBouncer will listen for connections.
- pool_mode: Defines how connections are managed (transaction, session, etc.).
- maxclientconn: Maximum number of simultaneous connections allowed.
- Configure users and passwords
Create an authentication file called userlist.txt:
sudo nano /etc/pgbouncer/userlist.txt
- Add users in the following format:
"username" "md5_password"- Note: Generate passwords in MD5 format using tools like openssl.
Step 3: Start and test PgBouncer
- Start the service
sudo systemctl start pgbouncer
- Enable it to start on boot
sudo systemctl enable pgbouncer
- Test the connection
From your application or database client, connect using the proxy port (6432 in this case). For example:
psql -h 127.0.0.1 -p 6432 -U username -d mydatabase
- If everything is configured correctly, you should be able to interact with the database through PgBouncer.
Practical example: Monitoring and adjustments
Once the proxy is running, it is crucial to monitor its performance and adjust the configuration as needed.
Connection monitoring
You can check PgBouncer's status with the following command:
sudo psql -h 127.0.0.1 -p 6432 -U username pgbouncer -c "SHOW POOLS;"
This will display metrics such as the number of active and waiting connections.
Common adjustments
- Increase defaultpoolsize: If you have many simultaneous connections, increase this value.
- Optimize pool_mode: Switch to session if you need to maintain persistent sessions.
Conclusion
A database proxy is much more than a simple intermediary: it is an essential tool for optimizing performance, ensuring security, and scaling database systems in complex environments. By managing connections, caching frequent queries, and balancing load, proxies allow developers and administrators to focus on what really matters: building robust and efficient applications.
In this blog, we explored the fundamentals of proxies, the prerequisites, and the detailed steps to configure PgBouncer as an example. By following this guide, you will improve the performance and security of your system, and you will also be better prepared to scale your applications as they grow.
Is your platform ready to support connection growth without compromising performance? At Kranio, we help organizations design scalable, secure, and future-proof data architectures. Let's talk about your next challenge.
Previous Posts

Agent Harness: Design Patterns for AI Agents
Discover what an Agent Harness is and the design patterns that transform AI models into agents capable of executing tasks, verifying outcomes, and scaling business processes.

AI-Powered Spec-Driven Coding: A Practical Guide for Teams
Discover how Spec-Driven Coding helps teams use AI to develop software with more control, better testing, and less technical debt.
