
Step-by-Step Guide: Build a Full Stack Application with AWS Amplify and React
There has been a lot of talk lately about AWS Amplify, but why?, what is it? and what is it for?
AWS Amplify is a set of tools (open-source code framework, management user interface, console) and services (static web hosting) that can be used together or individually in order to be a full stack option for creating a project.
Some of the web and mobile integration options are: Javascript, React, React Native, Angular, Vue, Next.js, Android, iOS, Ionic, and Flutter. For some frameworks, we have what they call UI Components that provide useful components for faster development.
However, the amount of documentation and options we have can become overwhelming.
Today we will focus on an application with AWS Amplify that will consist of creating a React application, using Amplify to add authorization with AWS Cognito, creating an API (API GATEWAY) with different paths and connecting it to lambda functions, in this way we have a structure that, depending on your needs or imagination, can serve as a template for infinite projects.
😉 Prerequisites:
- Node.js v12.x or later
- npm v5.x or later
- Git v2.14.1 or later
- Amplify CLI
npm install -g @aws-amplify/cli amplify configure : to configure you must have an AWS account to which you will be redirected to log in.Once you have logged in, Amplify CLI will ask you to create an IAM user. If you already have a user created, you can return to the terminal, press enter, and add your credentials.
AdministratorAccess or access to the following: AWS Amplify - AppSync - Cognito - API Gateway)
Specify the AWS Region
? region:# Your preferred region
Specify the username of the new IAM user:
? user name:# User name for Amplify IAM user
Complete the user creation using the AWS console

Enter the access key of the newly created user:
? accessKeyId:# YOUR_ACCESS_KEY_ID
? secretAccessKey:# YOUR_SECRET_ACCESS_KEY
This would update/create the AWS Profile in your local machine
? Profile Name:# (default)

Successfully set up the new user.
Example:
Specify the AWS Region
? region:  us-east-1
? user name:  jazmin@kranio.io
? accessKeyId:  AKIAIOSFODNN7EXAMPLE
? secretAccessKey:  wJalrXUtnFEMI/K7MDENG/bPxRfiCYEXAMPLEKEY
This would update/create the AWS Profile in your local machine
? Profile Name:  kranio

Successfully set up the new user.
🚀 Now it's time to start the project:
We will go step by step, some steps have one or more ways to implement, you can follow the option that suits you best.
🧠 Step 1: Create React App
npx create-react-app "new folder name or one already connected to a repository (bitbucket-gitHub-gitLab)"

example:

npx create-react-app AmplifyReactProject
cd AmplifyReactProject
🧠 Step 2: Initialize Amplify
- Tip: Amplify has a series of very complete commands that will help us do everything necessary from our terminal.
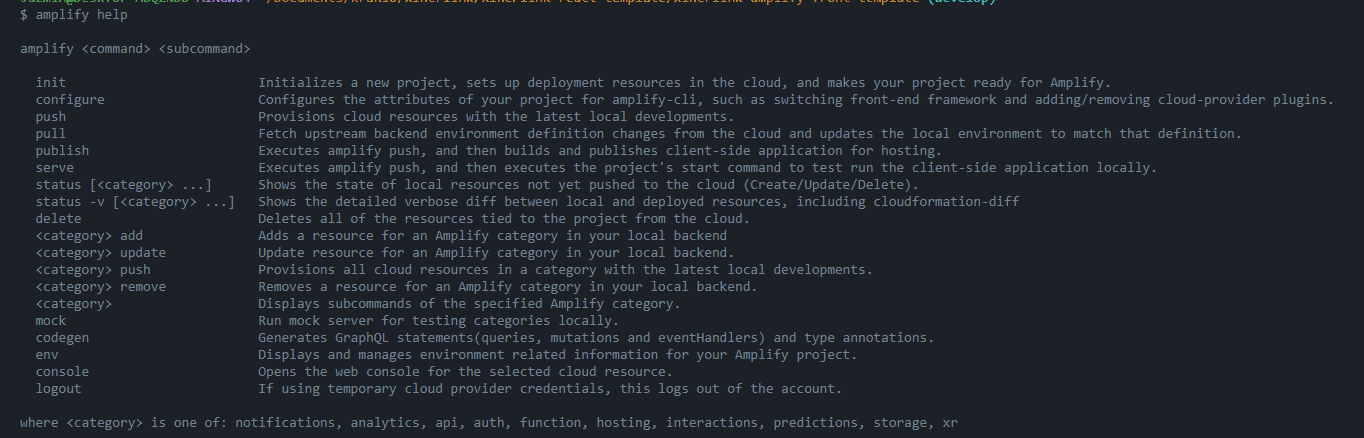
In the following code block you can see an example of how to initialize Amplify in your React App:
Enter a name for the project (AmplifyReactProject)

# All AWS services you provision for your app are grouped into an "environment"
# A common naming convention is dev, staging, and production
Enter a name for the environment (dev)

# Sometimes the CLI will prompt you to edit a file, it will use this editor to open those files.
Choose your default editor # example: VS Code

# Amplify supports JavaScript (Web & React Native), iOS, and Android apps
Choose the type of app that you're building (javascript)

What JavaScript framework are you using (react)

Source directory path (src)

Distribution directory path (build)

Build command (npm run build)

Start command (npm start)

# This is the profile you created with the `amplify configure` command in the introduction step.
Do you want to use an AWS profile
MORE INFO: https://docs.amplify.aws/start/getting-started/setup/q/integration/react/#initialize-a-new-backend
🧠 Step 3: Install amplify libraries (React)
npm install aws-amplify @aws-amplify/ui-react
🧠 Step 4: Configure Frontend
src / index.js and add the following code below the last import:
import Amplify from "aws-amplify";
import awsExports from "./aws-exports";
Amplify.configure(awsExports);
The aws-exports file is a configuration file generated by Amplify.
🧠 Step 5: Create or import Auth (Cognito) to Amplify
If you do not have an existing Cognito, you can create one this way:
$amplify add auth

? Do you want to use the default authentication and security configuration? Default configuration
? How do you want users to be able to sign in? Username
? Do you want to configure advanced settings?  No, I am done.

$amplify push
Import an existing Cognito:
amplify import auth
MORE INFO: https://docs.amplify.aws/cli/auth/import/
🧠 Step 6: Use auth for login on the front-end
To use this authorization (created or imported) in our App, we have two paths:
- With withAuthenticator:
src / App.js
and make the following changes:
withAuthenticator
and
AmplifySignOut
:
import { withAuthenticator, AmplifySignOut } from "@aws-amplify/ui-react";
AmplifySignOut
at the very beginning: This component helps us sign out of the session.
withAuthenticator
wrapper of the main component:
export default withAuthenticator(App)
npm start
and you should see this: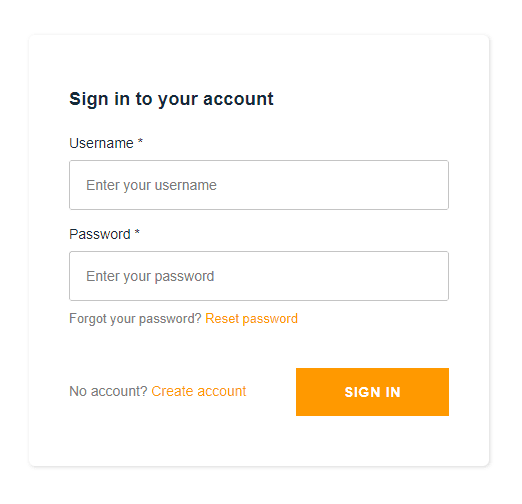
🔹 Now to access your app you must create an account (cognito), for that you can use the create account option, confirm with your email and log in.
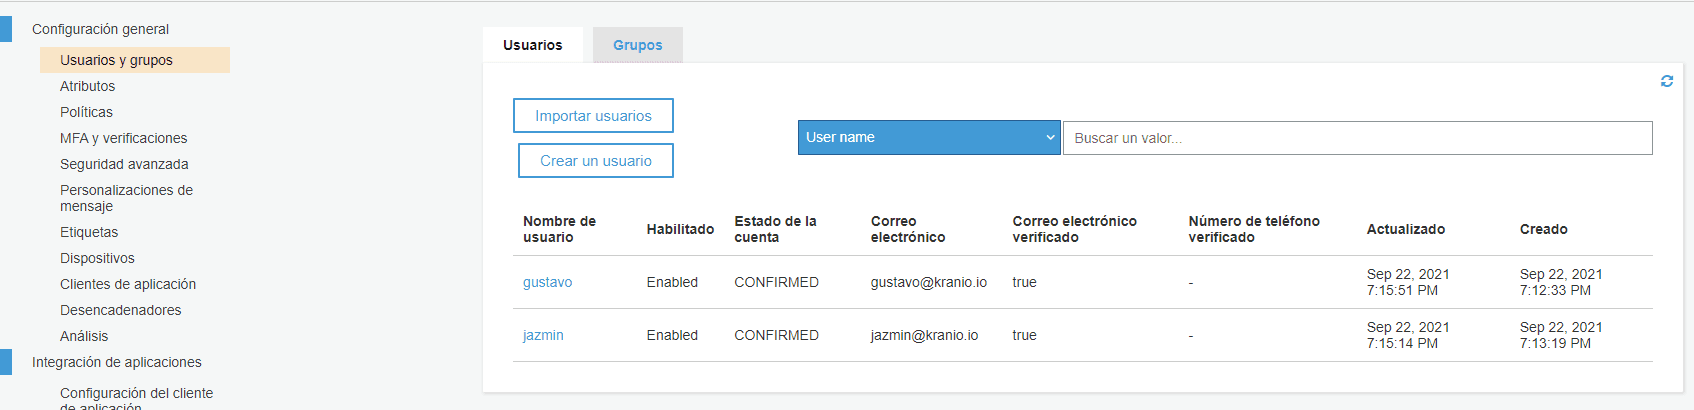
🔹 But you also have the option to enter cognito from the AWS console, find your userPool and add users manually:
If it is a private application it is recommended to disable the create account option and only create accounts from the console, so no one else can log in or create accounts.
🔹 To disable create account. In the Policies section answer the second question with the option: Allow only administrators to create users.

- With Customization:
We have the option to customize our Login, for that we need knowledge about the library being used, in this case React. You can get an idea with this documentation:
https://docs.amplify.aws/lib/auth/emailpassword/q/platform/js/#custom-attributes
https://docs.amplify.aws/start/getting-started/auth/q/integration/react/#create-login-ui
🧠 Step 7: Create an API Gateway with amplify (REST)
When creating an API we have many possibilities, today we will see how to add two paths each linked to a different lambda function.
Before creating the API let's understand what we want to achieve. We will link lambda functions to different paths in our API.
Like this:
/pathOne
a function will be created
{lambdaExampleOne}
/pathTwo
a function will be created
{lambdaExampleTwo}
When creating our API we will have to create a path immediately, so we will add one in this step and then see how to add another.
- When adding a function it gives us three options as "template", each has different purposes:
? Choose the function template that you want to use: (Use arrow keys)
❯ Hello world function
  CRUD function for Amazon DynamoDB table (Integration with Amazon API Gateway and Amazon DynamoDB)
  Serverless express function (Integration with Amazon API Gateway)
Hello World function
will create a basic Lambda hello world function
CRUD function for Amazon DynamoDB table (Integration with Amazon API Gateway and Amazon DynamoDB)
function would add a predefined serverless-express Lambda function template for CRUD operations on DynamoDB tables (which you can create following CLI instructions or use tables you have already configured with the amplify add storage command)
Serverless express function (Integration with Amazon API Gateway)
will add a predefined serverless-express Lambda function template with routing enabled for your REST API routesMORE INFO: https://docs.amplify.aws/cli/function/#set-up-a-function
$amplify add api

? Please select from one of the below mentioned services:
    `REST`
? Provide a friendly name for your resource to be used as a label for this category in the project:
    `KranioApiExample`
? Provide a path (e.g., /book/{isbn}):
    `/pathOne`
? Choose a Lambda source
    `Create a new Lambda function`
? Provide a friendly name for your resource to be used as a label for this category in the project:
    `kranio`
? Provide the AWS Lambda function name:
    `lambdaExampleOne`
? Choose the function runtime that you want to use:
    `NodeJS`
? Choose the function template that you want to use:
    `Serverless ExpressJS function (Integration with API Gateway)`
? Do you want to access other resources created in this project from your Lambda function?
    `No`
? Do you want to invoke this function on a recurring schedule?
    `No`
? Do you want to edit the local lambda function now? `No`
Successfully added the Lambda function locally
? Restrict API access
    `Yes`
? Who should have access?
    `Authenticated`
? What kind of access do you want for Authenticated users?
    `create, read, update, delete`
Successfully added auth resource locally.
? Do you want to add another path?
    `No`
$amplify push
Once the API is created we can import and configure it in our App.
App.js
in React or
main.ts
in Angular:
We also have the option to import an existing API simply by omitting the creation and adding it directly to the configuration.
This configuration allows us to make requests directly to the API, for example for a GET:
import { API } from "aws-amplify";

const apiName = 'MyApiName';
const path = '/path';
const myInit = { // OPTIONAL
    headers: {}, // OPTIONAL
    response: true, // OPTIONAL (return the entire Axios response object instead of only response.data)
    queryStringParameters: {  // OPTIONAL
        name: 'param',
    },
};

API
  .get(apiName, path, myInit)
  .then(response => {
		console.log(response);
    // Add your code here
  })
  .catch(error => {
    console.log(error.response);
 });
🧠 Step 8: Add another path to our API
In the previous step we created our API and configured it, now we will add a new path and link it to a new Lambda function just like the previous path.
// Options to add, update, or remove path:

$ amplify api update
? Please select from one of the below mentioned services: REST
? Please select the REST API you would want to update KranioApiExample
? What would you like to do
> Add another path
  Update path
  Remove path
$ amplify api update
? Please select from one of the below mentioned services: REST
? Please select the REST API you would want to update KranioApiExample
? What would you like to do Add another path
? Provide a path (e.g., /book/{isbn}): /pathTwo
? Choose a Lambda source (Use arrow keys)
> Create a new Lambda function
  Use a Lambda function already added in the current Amplify project
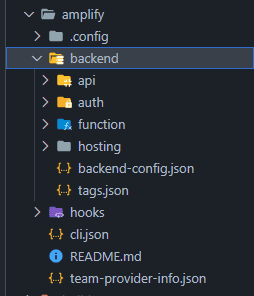
These actions generated folders with the resources inside the Amplify/backend directory, where we can work on the functionality for the lambdas.
🧠 Step 9: Amplify Deploy
After creating our resources in Amplify, both frontend and backend, we need to deploy them. For this, we have several options.
We have the command:
amplify push
To deploy only the backend of our Amplify project.
We also have the command:
amplify publish
Which will deploy both the frontend and backend of our project. But to deploy the frontend, we first need to create a hosting, which consists of a structure that will host the web application. We have three options: Amplify Console, directly in an S3 bucket, or a combination of an S3 bucket with CloudFront.
For this, we use the command:
amplify add hosting
MORE INFO: https://docs.amplify.aws/cli/hosting/hosting/
Amplify CI/CD
We have two options to have a continuous deployment pipeline with Amplify: manual or automated by Amplify. When adding hosting, you can choose how you want to do it. The interesting part is that you can have a specific type for each environment and a format for dev, a format for a feature branch, a format for QA, always choosing what best suits you.
The following is an example of automated deployment with Amplify:
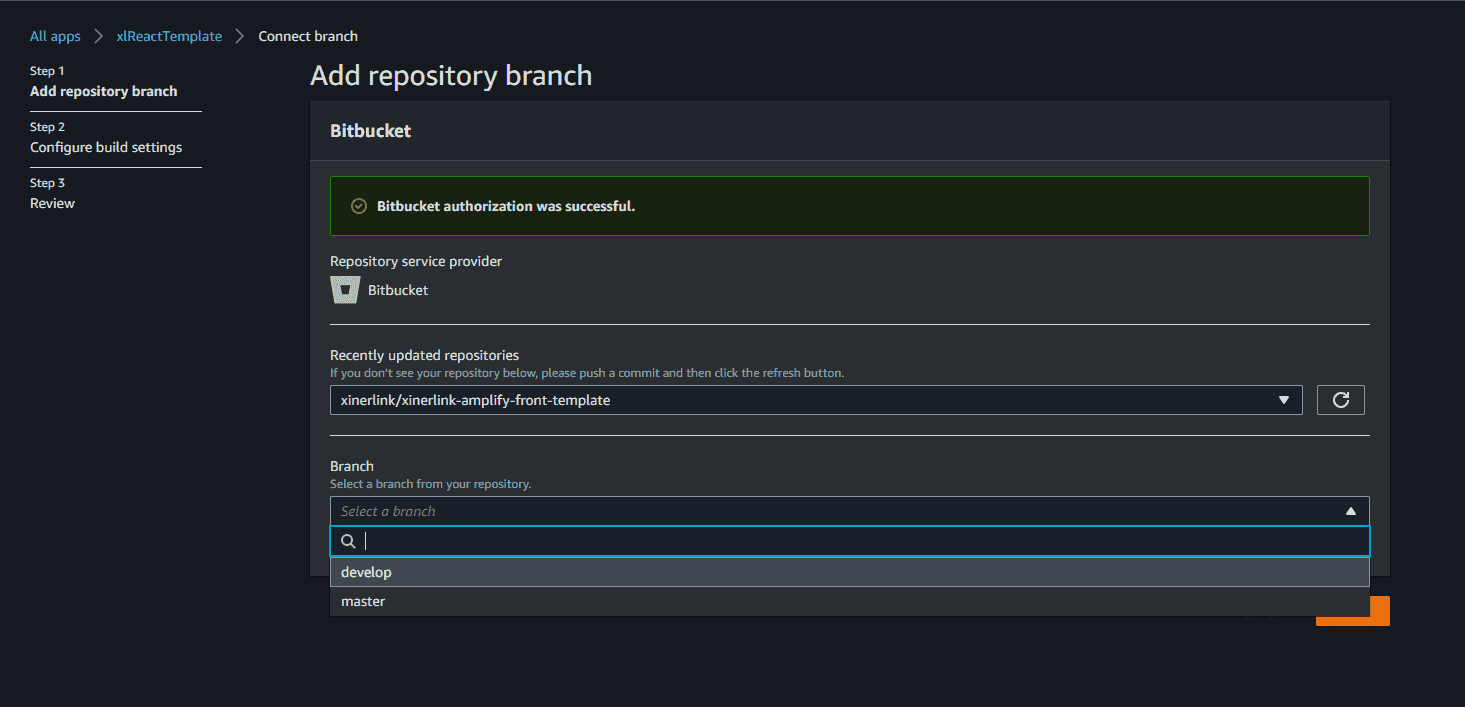
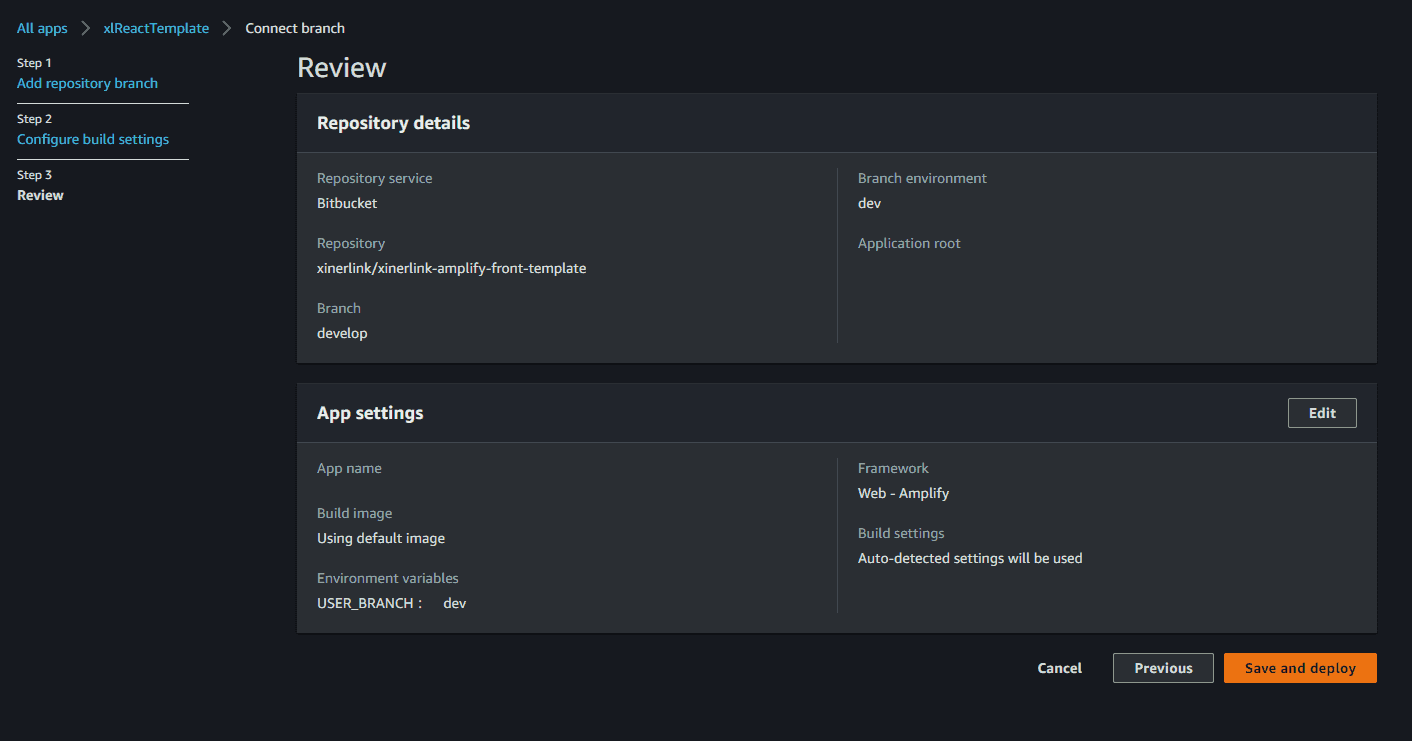
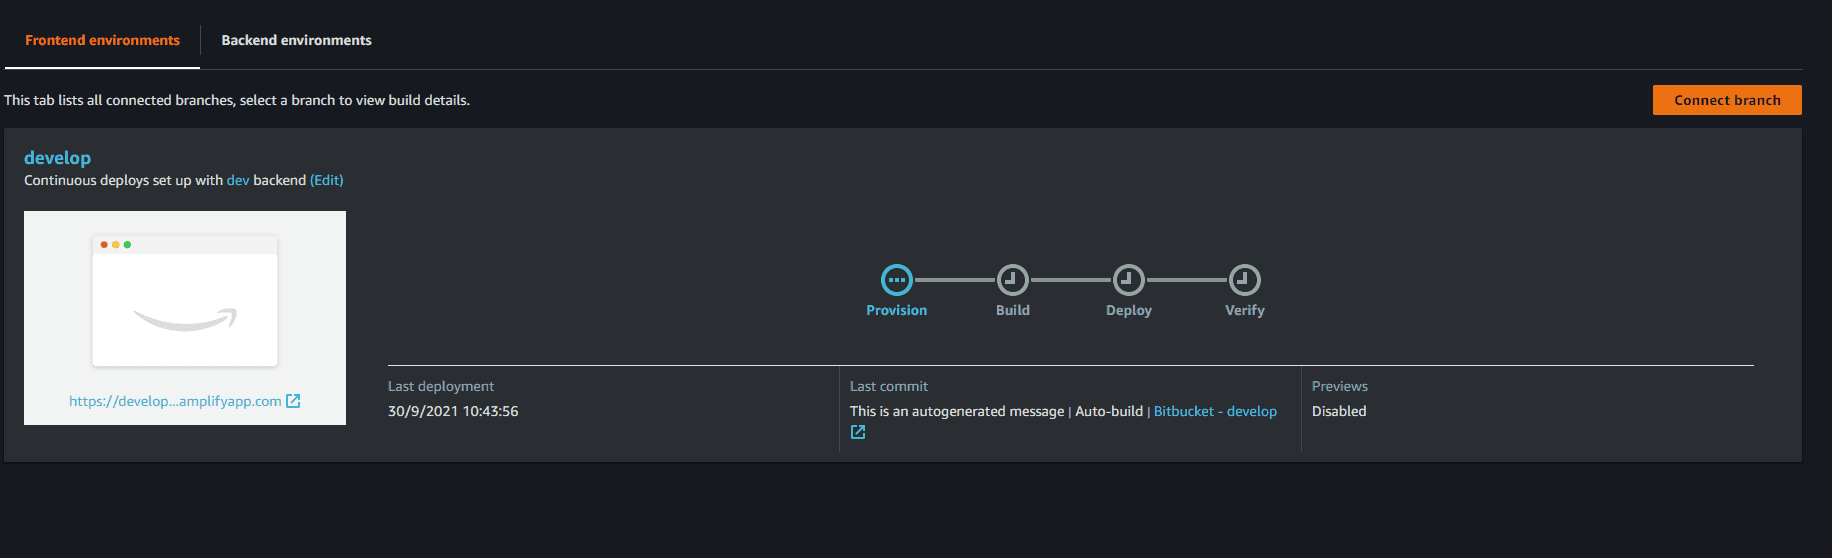
- First, locate the front environment of our App in AWS Amplify and connect it to our repository:

- Then choose the branch where you want to deploy, in this case develop, however, as mentioned before, you can configure as many automated deployments as branches your project has.
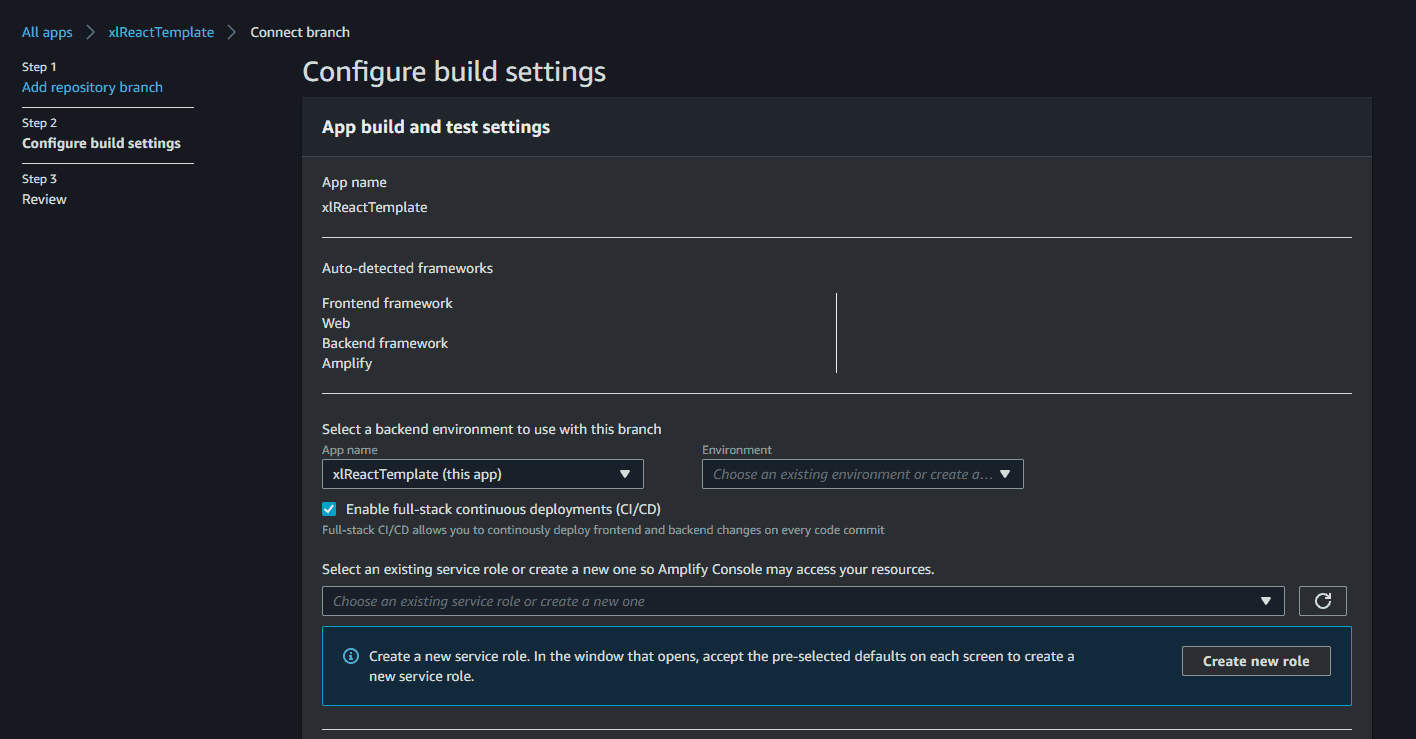
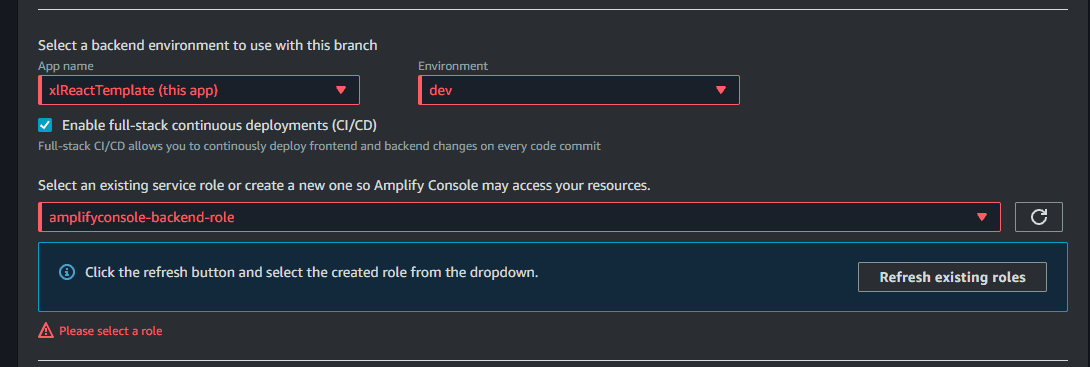
- Next, select our application in the environment (dev) and add a role with access to Amplify. If there isn't one, you can easily create it in the Create new role option and follow the indicated steps, then refreshing to make it appear is enough.
- This is necessary to continue:
- Before moving to the next step, check the box: Allow AWS Amplify to automatically deploy all files hosted in your project root directory
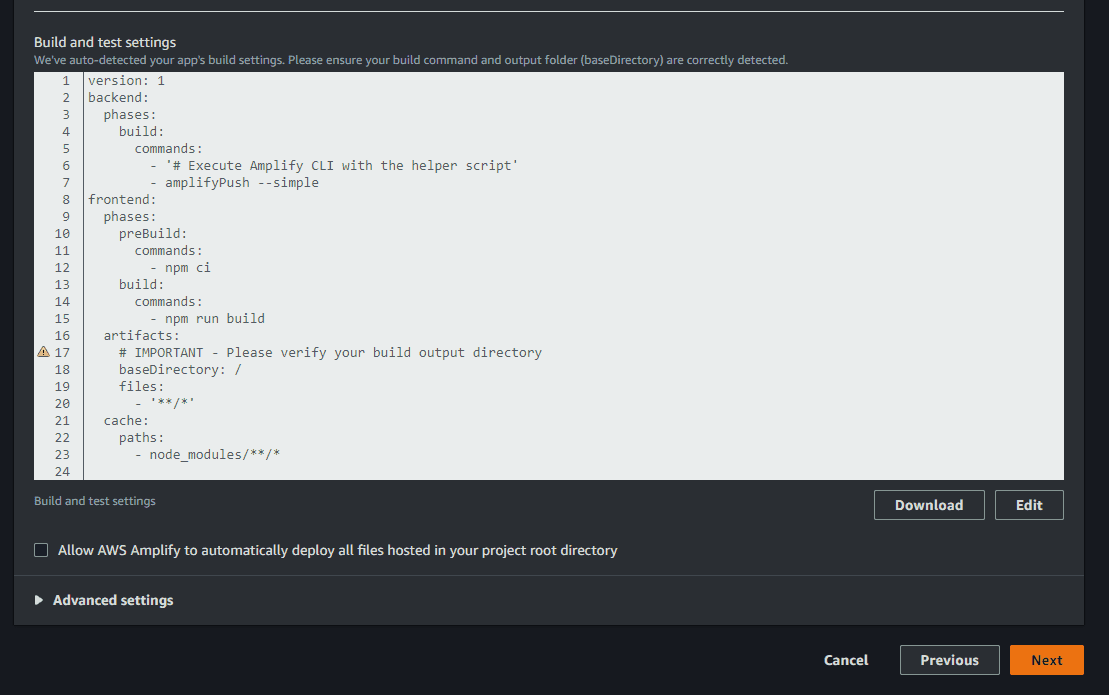
- Finally, press Save and Deploy and that's it, the application will start the deployment:
🧠 Conclusion
Finally, now you know what Amplify is, its options, and you have a guide example of how to implement backend services like API Gateway, Cognito, Lambda Functions with a specific Front-end library. You have a process to create an application with AWS Amplify. It's time to adapt it to your needs. Whether you have a frontend application that needs a fast and scalable backend or you want to start from scratch, this will undoubtedly be a good option.
Ready to develop your next application with AWS Amplify and React?
At Kranio, we have a team of experts who will guide you in creating efficient and scalable full-stack solutions, making the most of AWS capabilities. Contact us and discover how we can boost your tech project.
Previous Posts

How to implement a database proxy with PgBouncer: step-by-step guide
Learn how to implement a database proxy with PgBouncer. Improve performance, reduce connections, and scale PostgreSQL easily.

Agent Harness: Design Patterns for AI Agents
Discover what an Agent Harness is and the design patterns that transform AI models into agents capable of executing tasks, verifying outcomes, and scaling business processes.
